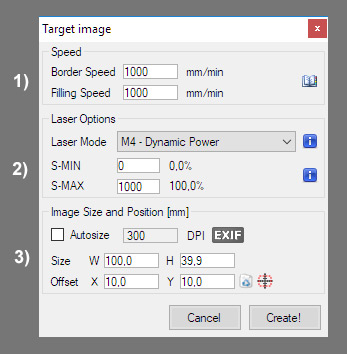
From this dialog you can set final image size and offset as well as laser speed, power and laser mode.
1) Speed
- Filling speed / Engraving speed is the speed at which an image will be filled by laser moves.
- Border speed is the speed used for border pass (or cut) by the vectorization tool.
If your job is coming out too light or too dark you can slow down or increment the requested job speed. (Is it possible to do little adjustment at runtime via overrides)
Please note that LaserGRBL will command these values, but it is possible that the machine does not respect them because for example it is limited by its maximum configuration speed. (See grbl configuration)
2) Laser options
The laser is enabled with the M3 spindle or M4 spindle commands. These enable two different laser modes that are advantageous for different reasons each.
M3 Constant Laser Power Mode
Constant laser power mode simply keeps the laser power as programmed, regardless if the machine is moving, accelerating, or stopped. This provides better control of the laser state. This can lead to more consistent cuts in more difficult materials.
M4 Dynamic Laser Power Mode (new in grbl v1.1)
While performing an engraving job, the laser head must constantly accelerate and decelerate to follow direction changes . With M3 mode this can cause more severe burns where the laser slows down.
Dynamic laser power mode will automatically adjust laser power based on the current speed relative to the programmed rate. It essentially ensures the amount of laser energy along a cut is consistent even though the machine may be stopped or actively accelerating. This is very useful for clean, precise engraving and cutting on simple materials across a large range of G-code generation methods by CAM programs. It will generally run faster and may be all you need to use.
Grbl calculates laser power based on the assumption that laser power is linear with speed and the material. Often, this is not the case. Lasers can cut differently at varying power levels and some materials may not cut well at a particular speed and/power. In short, this means that dynamic power mode may not work for all situations. Always do a test piece prior to using this with a new material or machine.
M4 is available if LaserGRBL is connected to a grbl v1.1+ machine with Laser Mode option enabled ($32=1). Otherwise only M3 is available.
For more info, read about laser mode support in grbl v1.1 wiki.
S-MIN and S-MAX (Power Modulation)
With S-MIN and with S-MAX you can set the laser power.
LaserGRBL can process grayscale images to produce power modulated line by line engraving. Power modulation is hardware implemented as PWM modulation on arduino PIN D11, controlled by “S command”. LaserGRBL will use S-MIN for white pixels of the image, and use S-MAX for the black pixels of the image.
Usually S-MIN it is left set to zero, but you can rise it a little if your laser does not burn under a certain S lever.
For S-MAX you have to express a power level that which is in relation to the max PWM value you set in the grbl configuration. For some the maximum value, which expresses a power of 100% is 1000, for others it is 255. It depends on how your controller is configured. For more information read the grbl configuration guide.
You can of course use the 100% of your laser or you can set a lower S value if your job is coming out too dark of if you want to preserve your laser lifespan. You can also use a value greater than 100% if you want to over-burn your image.
GRBL’s PWM functionality – How to control a laser or variable speed spindle.
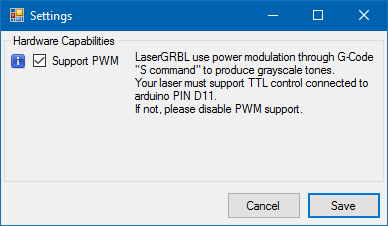
If your hardware does not support power modulation you have 2 choice:
- Modify/Hack your engraver to add PWM control
- Configure LaserGRBL for pwm-less hardware, unchecking “Support PWM” in settings. Pwm-less support was added in v2.5.1-pre
3) Image size and position
You can now decide how big should be your image, and its position in space.
LaserGRBL will keep the image ratio fixed, so if you scale the height, width is changed consequently. If you want to have a different ratio, please edit your image in an external program / editor.
LaserGRBL will use the whole image file size (including surrounding white-spaces) as source image, so if you need to rid-off of some borders you should trim your image in an external program / editor. (or adjust it in the previous raster import dialog).
The check-box “Autosize” tries to automatically determine the image size from the resolution information contained in the file.
With “Offset” you can add an offset (positive or negative) to generated job. LaserGRBL will warn you if you put a negative offset but your engraver is set to work in positive space.